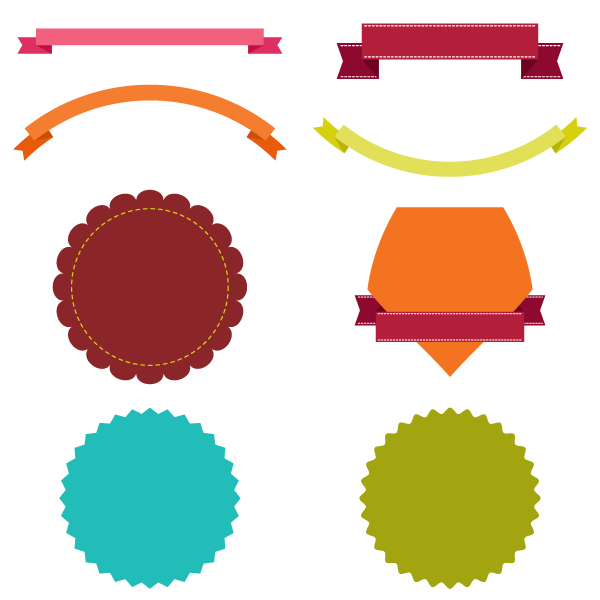
How to Create Banner, Label and Badge Templates in Illustrator
1. Create a Traditional Banner
Step 1
After creating a New document, take the Rectangle Tool (M) and draw a long rectangle. Set its color to (R=241, G=96, B=124).
Step 2
Draw another rectangle to the back by pressing Control-C, Control-B keys. Make it darker (R=221, G=47, B=97).
Step 3
Switch on the Smart Guides (View Smart > Guides) and put an anchor point in the middle of the left side of our rectangle. Take the Direct Selection Tool (A) and move the anchor point to the right.

Step 4
Select two created shapes and make a copy of them (Control-C, Control-F). Then go to Pathfinder panel and press the Intersect button. Color the new shape in color R=196, G=14, B=66.
Step 5
And now - the trick: take the Direct Anchor Point Tool (A) and select two anchor points as shown in the image below. Go to Align panel and press Vertical Align Bottom.

Step 6
Select the darkest shape, right-click on your mouse and choose Arrange > Send Backward.
Step 7
It's good if the Smart Guides (View > Smart Guides) are still switched on. It will be easier for you to make a reflection.Select the darker (R=221, G=47, B=97) and the darkest (R=196, G=14, B=66) rectangles (remember to hold the Shift button for selecting two shapes at the same time) and press right-click on your mouse. Then select Transform > Reflect and Vertical axis of reflection in a new appeared window, and press Copy. Move the new copies to the right. That's it!

2. Create a Curved Upwards Banner
Step 1
Make another copy (Control-C, Control-V) of this banner and change its color to orange. I used R=244, G=125, B=48 (orange), R=232, G=90, B=12 (darker orange) and R=207, G=77, B=6 (darkest orange). But of course, you can use any color you want.
Step 2
Group the whole banner (right-click > Group). Go to Effect > Warp > Arc and adjust the options like on the image below.
Step 3
Let's create a curved downwards banner.Make a copy of the orange banner and change its color to yellow. Make sure that the whole banner is grouped. Go to the Appearance panel and click on the Warp: Arc. In the appeared window in a Bend section set the value as -50%. Below you can see result:

3. Create a Banner with a Stitched Effect
Step 1
For changing colors use the next values: R=179, G=30, B=59 (lightest red); R=142, G=9, B=47 (darker red); R=109, G=3, B=33 (darkest red). Stretch the banner using the Selection Tool (V).
Step 2
Draw two white lines using the Line Segment Tool (\).
Step 3
Go to the Stroke panel and check Dashed Line. In a first dash box enter 4 pt.
Step 4
Put these dashed lines on the back shapes of the banner.
Step 5
And on the other side.
4. Create a Badge with the Zig-Zag Effect
Step 1
Using the Ellipse Tool (L), draw a blue ellipse (R=34, G=188, B=185).
Step 2
Go to Effect > Distort and Transfort > Zig Zag. Adjust the options as shown on the image below:
Step 3
Create one more copy of this label, make sure that resulting shape is selected and take a look on the Appearance panel.Click on Zig Zag and in the Points section check Smooth instead of Corner. Change the fill color to R=163, G=165, B=16.

5. Create a Badge with the Pucker & Bloat Effect
Step 1
Take the Polygon Tool and simply click on your artboard. In window enter 20 sides and press OK. Set its color at R=138, G=37, B=41.
Step 2
Now press Effect > Distort and Transform > Pucker and Bloat. Move the slider to the right until you get 9%, OK.
Step 3
Take off the fill color. For the stroke color use values: R=213, G=209, B=14.Draw a circle inside, using the Ellipse Tool (L) and on the Stroke panel check the Dashed Line box. Set 8 pt in a first dash box.

6. Create a Basic Shield Shape
Step 1
Take the Rectangle Tool (M) and draw a rectangle with the fill color R=243, G=115, B=33. Using the Smart Guides to put an anchor point on the bottom of the rectangle with the Pen Tool (P).
Step 2
Press the Direct Selection Tool (A) and shift down the new anchor point.
Step 3
Press Effect > Warp > Bulge and adjust the options in appeared window like on the image below.
Step 4
Put the banner, created in a Step 3 in a front and see how it looks.
Step 5
Make a Horizontal reflection of the banner: select the whole banner, right-click on the mouse and press Transform > Reflect. Then choose Horizontal, OK.
Step 6
If your banner was grouped, Ungroup it (right-click > Ungroup). Put the corresponding parts to the back (Control-X, Control-B).
Great Job, You're Now Done!
So, in a few simply steps you learned how to create different banners, labels and badges. You have the templates, just add some text and design elements. Congratulations, you did a wonderful job!
How to Create Banner, Label and Badge Templates in Illustrator
![How to Create Banner, Label and Badge Templates in Illustrator]() Reviewed by
Technology Support
on
2:49:00 AM
Rating:
Reviewed by
Technology Support
on
2:49:00 AM
Rating:


No comments :